

Every professional website needs a reliable way for visitors to get in touch. Whether you’re running a blog, business website, portfolio, or service platform, a well-designed contact form improves communication, builds trust, and increases conversions.
In this article, we will explore How to Design a High-Converting Contact Page with Elementor to enhance user experience and boost engagement.
If you’re looking for a simple yet powerful way to create a custom contact form using Forminator, you’re in the right place.
Forminator is a free WordPress plugin that allows you to build advanced contact forms, payment forms, quizzes, and polls without writing a single line of code. In this complete step-by-step guide, you’ll learn how to install Forminator, design a custom contact form, configure email notifications, and embed it on your website.
Let’s get started.
What Is Forminator?
Forminator is a free WordPress form builder plugin developed by WPMU DEV. It offers:
- Drag-and-drop form builder
- Custom fields
- Conditional logic
- Spam protection
- Payment integrations (Stripe & PayPal)
- Email notifications
Unlike many premium-only plugins, Forminator provides advanced features in its free version, making it ideal for beginners and small businesses.
Why Use Forminator for Contact Forms?
When you create a custom contact form using Forminator, you get:
- Full customization control
- Professional design templates
- Responsive mobile-friendly forms
- Built-in spam protection (Google reCAPTCHA)
- Easy integration with WordPress pages
Forminator is lightweight and optimized for performance, which is important for SEO and user experience.
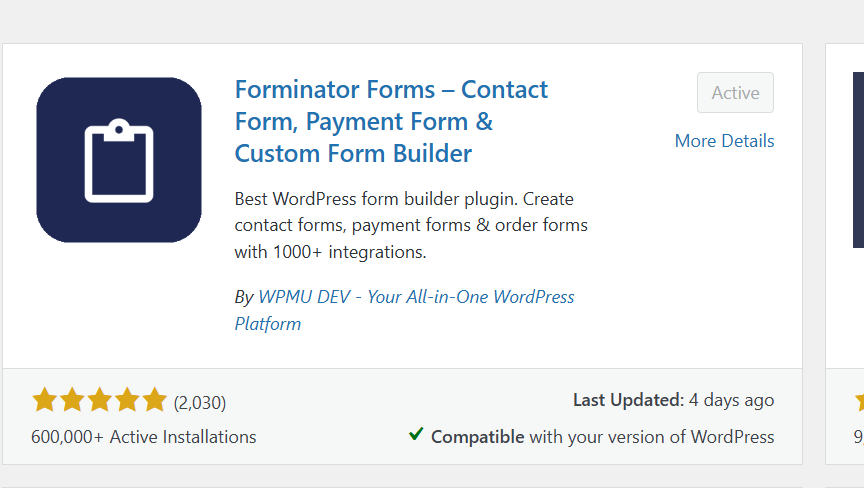
Step 1: Install and Activate Forminator
To begin:
- Log in to your WordPress dashboard
- Navigate to Plugins → Add New
- Search for Forminator
- Click Install Now
- Click Activate
Once activated, you’ll see “Forminator” in your WordPress dashboard menu.
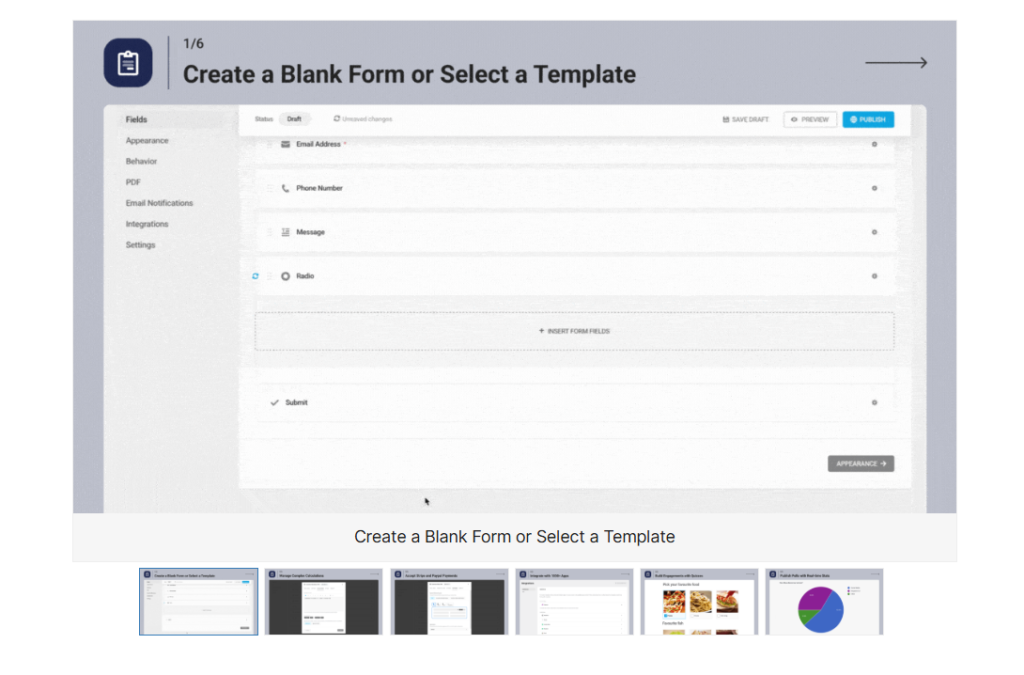
Step 2: Create a New Contact Form
Now it’s time to create a custom contact form using Forminator.
- Go to Forminator → Forms
- Click Create
- Choose Contact Form
- Select a template or start from scratch
- Click Create
Forminator provides default fields like:
- Name
- Message
You can easily customize these.
Step 3: Customize Your Contact Form Fields
To make your form unique:
- Click any field to edit its label
- Add new fields like:
- Phone number
- Dropdown selection
- File upload
- Checkbox
Date picker
You can also:
- Mark fields as required
- Add placeholder text
- Customize field spacing
- Rearrange fields with drag-and-drop
This flexibility allows you to fully create a custom contact form using Forminator that matches your business needs.
Step 4: Configure Email Notifications
To receive submissions:
- Click Emails tab inside your form editor
- Add an admin email notification
- Enter your email address
- Customize the subject line
- Save settings
You can also set up auto-responder emails so users receive confirmation after submitting the form.
Step 5: Add Spam Protection (Highly Recommended)
To prevent spam:
- Go to Settings → Google reCAPTCHA
- Connect your reCAPTCHA keys
- Enable reCAPTCHA in your form settings
Spam protection improves security and protects your inbox.
Step 6: Style Your Contact Form
Forminator allows styling customization:
- Change button colors
- Adjust form layout
- Modify fonts
- Customize borders
You can match the form design with your website branding.
If you’re using Elementor, you can embed the form and style it further using Elementor widgets.
How to Design a High-Converting Contact Page with Elementor (Step-by-Step)
How to Design a Website Service Page Using WordPress
How to Design a Responsive Website on WordPress Using Elementor
How to Design a Website About Us Page on WordPress Using Elementor (Beginner Guide)
How to Create a Website Homepage in WordPress (Easy Guide for Beginners)
How to Install Elementor on WordPress (Beginner’s Step-by-Step Guide)
How to Design Header and Footer Using Kadence Theme
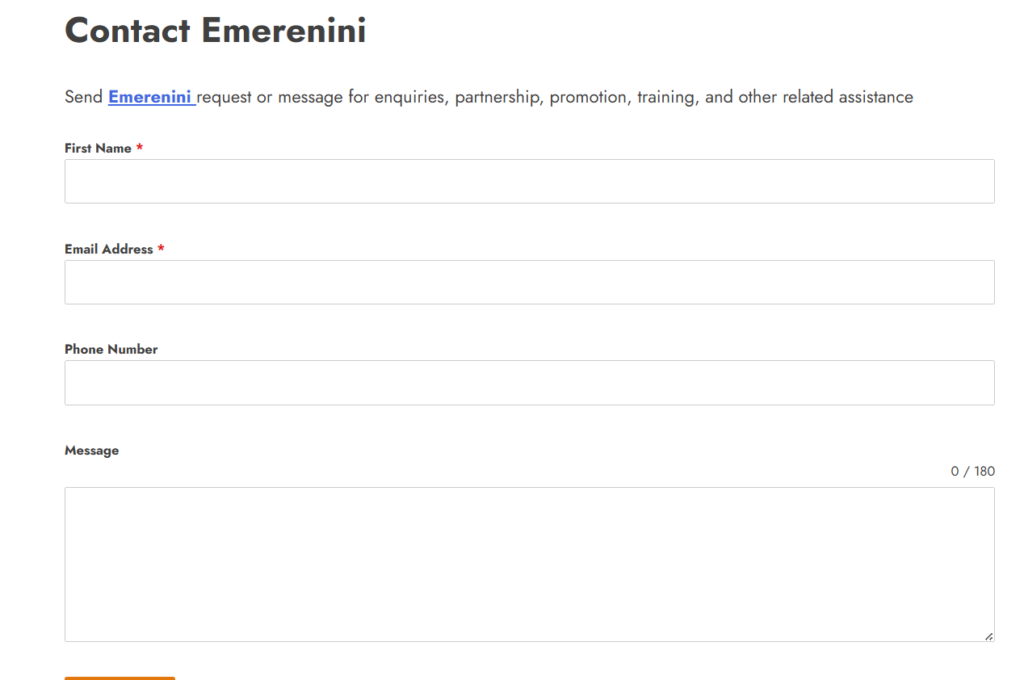
Step 7: Embed the Contact Form on a Page
To display your form:
- Click Publish
- Copy the shortcode
- Go to Pages → Add New
- Paste the shortcode into the page
- Publish the page
Alternatively, use the Forminator block inside Gutenberg editor.
Now your custom contact form is live.
Common Mistakes to Avoid
- Not configuring email notifications
- Forgetting spam protection
- Using too many required fields
- Not testing the form before publishing
- Ignoring mobile responsiveness
Always test your form after publishing.
Frequently Asked Questions (FAQ)
-
Is Forminator free to use?
Yes. Forminator offers a powerful free version with advanced features.
-
Can I customize form fields?
Yes. You can add, remove, or rearrange fields easily.
-
Does Forminator support payment forms?
Yes. It integrates with Stripe and PayPal for payment forms.
-
Is Forminator beginner-friendly?
Absolutely. It uses a drag-and-drop builder with no coding required.
-
Can I use Forminator with Elementor?
Yes. You can embed Forminator forms inside Elementor pages.
Learning how to create a custom contact form using Forminator is essential for improving communication and conversions on your WordPress website. With its powerful drag-and-drop builder, flexible customization options, and built-in spam protection, Forminator makes form creation simple and professional.
Whether you’re running a blog, business site, or service platform, implementing a custom contact form will enhance your website’s functionality and user experience.
Start building your contact form today and make it easier for visitors to connect with you.
Table of Contents
Pages
Popular
- How to Turn a Smartphone Into a Full-Time Income Machine: Step-by-Step Guide.
- Essential WordPress Security Tips to Protect Your Website Effectively
- How to build your first website using Elementskit for free
- WordPress Posts vs Pages: What’s the Difference and When to Use Each
- How to Write Your First WordPress Blog Post (Step-by-Step Beginner Guide)


[…] How to Create a Custom Contact Form Using Forminator […]
[…] How to Create a Custom Contact Form Using Forminator […]